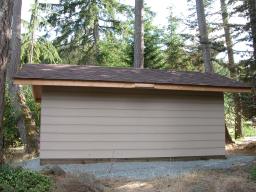
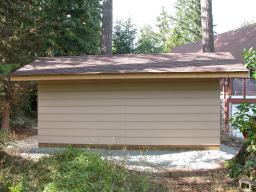
Our new storage shed, Summer 2007
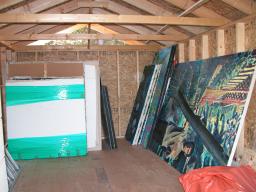
We have been renting a storage shed to hold some of the stuff that we moved but which will not fit into our house (like boxes of china and numerous 5' x 5' paintings). For the first year, we were content to rent a storage shed in Ladysmith. However, recently it has come up for sale, and as our contract expires in Sept, it seemed prudent to make some alternate arrangements. As there is room on the property, we decided to build our own storage shed.I decided that rather than something on a concrete pad, I wanted instead a skid-mounted shed that I could move later on if I wanted. There was an area above the pond that I had already used to store my pile of gravel (from the glass studio and some landscaping work at the front), and that seemed a good place. The plus is that it's right at the end of the driveway, so access is convenient.
Day 1 (07/31/2007)
Prior to the "day one", I borrowed my neighbor Bill's Komatsu front-end loader (like a bobcat) and spread the gravel pile around the chosen location, trying to get it fairly smooth. It was most certainly NOT level. Rather than dig it out, I chose to build up the lower area with more gravel.
On the first day of the build, I borrowed Bill's "hauling trailer" and went to Rona to pick up a great percentage of the wood required. This included 4x6 pressure treated beams for the skids, plus enough pressure treated (PT) 2x4's for the sub-floor. I was going to use 6/16" OSB for the floor, but this changed (see later).
There was also some calamity during the trip to Rona as Bill's pickup (F250 deisel) was required as it had the proper hardware to haul the trailer. Unfortunately duing the loading process, I killed the battery and NOTHING would get it to go. Even CAA was hopeless. Eventually Bill showed up in my white truck with a spare battery and that did the trick.
Day one ended with the lumber unloaded and the skids placed, but not level.
 03.jpg)
 05.jpg)
 06.jpg)
 11.jpg)
 12.jpg)
 13.jpg)
 14.jpg)
 15.jpg)
Day 2 (08/01/2007)
Day 2 began with some phone calls followed by a trip to Friesen's Rental for 3 scoops (1 yard) of gravel (driveway chips). This was shoveled onto the pad area, and the outer two skids were levelled and positioned.
 2.jpg)
 3.jpg)
 4.jpg)
 5.jpg)
 6.jpg)
 7.jpg)
 8.jpg)
Day 3 (08/02/2007)
Day 3 started with a trip for more gravel (4 scoops), more levelling of the outer skids, and then placement and levelling of the remaining two inner skids. Once everything was level and square, I cut the 2x4 pressure treated lumber to create the sub-floor. My ancient two battery powered drills were inadequate to the task, so a borrowed electric was used, though not very efficient, but it did get the job done. On the last trip to Friesen's, I bought some 3/4" plywood for the floor, but was not all that happy with the purchase (very pricey).
 1.jpg)
 3.jpg)
 4.jpg)
 5.jpg)
Day 4 (08/03/2007)
Day 4 started with another trip to Friesen's - to return the plywood. I had decided that I wanted 5/8" tongue-and-groove for the floor, plus didn't like the high price of the 3/4". After returning the plywood, I picked up another 3 scoops (1 yard) of gravel, which I distributed in any hollows between the skids and around the perimeter for stability.
After lunch, we headed in to Nanaimo to Home Depot to pick up some 5/8" TNG (tongue-and-groove) plywood plus some extra pressure treated 2x4's for braces. I also picked up some overpriced 2x4's for roof bracing, which will go back on day 5! Then on to Canadian Tire to buy a CraftMate 14.5V drill as I decided that I really needed a new drill for this type of work. Home Depot had only very pricey cordless drills, and one perfect corded (Ryobi) drill with a clutch, but of course there was no stock and no reorder. So off to CDN Tire for something *in stock* and relatively inexpensive.
Back home, I cut the braces and installed them with my new drill. Very nice! Then I finished the day by installing most of the tongue-and-groove 5/8" plywood floor. At the moment, it is only held at the 4 corners of each sheet as the deck screws that I bought at Rona are 3" and kind of long for plywood (or maybe not - I haven't decided yet). After some fitting and adjusting, thanks to the spacing requirements of both tongue and groove and the 16" center sub-floor, the floor was in place except for one sheet, which will be cut tomorrow.
Tomorrow should see the completion of the floor, plus another trip to Home Depot to return the over-priced 2x4's (knotty pine @ 12.50 each instead of 2x4 Kiln Dried studs @ 3.50 or so).
 01.jpg)
 02.jpg)
 03.jpg)
 04.jpg)
 05.jpg)
 06.jpg)
 07.jpg)
 08.jpg)
 09.jpg)
 10.jpg)
 11.jpg)
 12.jpg)
 14.jpg)
 15.jpg)
 18.jpg)
 19.jpg)
Day 5 (08/04/2007)
Day 5 started with cutting and fitting the final sheet of plywood for the floor. Since the cut edge doesn't have the groove to fit the tongue, I used my router to dado a "ship-lap" joint to provide the same overlap. With a few long screws, the final two sheets of plywood were down.
After lunch it was off to Home Depot for a return (the pricey 2x4's) and purchase of 4 regular 2x4's instead. I also bought some 2" deck screws to finish fastening down the plywood.
 01.jpg)
 02.jpg)
Day 6 (08/06/2007)
Took a few days off, finished the floor using many 2" deck screws. Checked plumb - cross measuring shows the floor is only out 1/8" overall. Not bad. Rain is on the way, so rolled out a few tarps to cover the shed.
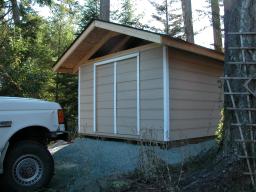
In the afternoon, I built the walls (not shown). Cut studs so that the finished wall will be 6' high - this is a nice height for me, and allows me to get two studs out of a single 12' 2x4 for some economy. There is a 5' door in the center of the front wall with a double header for strength. Walls are 16" on center, with 4', 8' and 12' carefully measured.
Also went out and bought the remaining OSB for the roof and stored it in the garage.
Day 7 (08/11/2007)
Again, a few days off to do some diving, plus avoid the rain (just showers as it turns out). Today was a busy day, starting with raising the walls, levelling and then securing them down (and to each other). I still need to install the between-the-joist braces, plus lag bolt the walls to the sub-floor, but it's strong enough to stand without any problem.
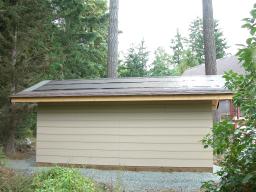
After the walls were up, I did a mock-up of two roof styles. Even though my design was for a peaked roof, I decided to see what a "shed roof" would look like. The photos show the result of just the shed roof, then also the peaked roof mockup. In the end, I chose the peaked roof (foreground) as the shed roof looks like something found in the Roger's Pass to protect from avalanches. I finished the day by cutting wood for 3 rafter sets, and assembling 2 rafters into trusses for the front and back.
 1.jpg)
 2.jpg)
 3.jpg)
 4.jpg)
Day 8 (08/12/2007)
Today I continued cutting rafters for the front, back and center of the shed. I decided that it would be much easier to raise the ridgepole and rafters if I created trusses instead, so today I worked at making the first three trusses. Eventually I will have 5 trusses; front, back, center, and at 4' and 12'. This should create a strong roof with the remaining rafters installed on 2' centers.
Day 9 (08/13/2007)
Today I finished cutting the rafters out of 2x6 lumber, then finished assembling the remaining trusses. After that, time to begin raising the ridgepole and trusses. I started by cutting the ridgepole to length (24'), then measuring and marking all rafter locations on the ridgepole so that the ends, 4' and 8' (middle) were exact for OSB installation. After that, I began with the back truss and ridgepole, then the center. I tied off the center to prevent collapse, then installed the front truss. After checking level and assuring all marks were on, I started screwing everything to secure the trusses and ridgepole. I cut and installed two cross-braces (front and back) to keep the roof from falling over. Then I finished by installing the 4' and 12' trusses and making sure everything was secure.
 1.jpg)
 2.jpg)
Day 10 (08/14/2007)
Today was a short work day. All I did was cut the remaining rafters. Even then, I managed to mess up one. The measurement was 6' 9", but I kept measuring 5' 9", then correcting. Except on the second last board. Now I am one rafter short. Now I require one additional board (8' 2x6) to finish the roof rafters.
Day 11 (08/15/2007)
I started the day by cutting the birdsmouth into each rafter. I kept reminding myself that I did not need a birdsmouth in the end rafters, but of course I cut one anyway. Now I need to remake all FOUR end rafters! That means two more 14' 2x6 instead of one 8' 2x6.
I also cut the remaining two 20' 2x6 boards to length (20' exact), then installed them on the gutter end of the rafters. This took some doing. I tried various techniques to hold the boards in place while I made adjustments. Several did not work, and after an hour or so all I had to show was dehydration (it was hot and sunny) and a bump on my head where one board had smacked me.
Linda had a good idea - using a rope to hold the board in place. I placed two of the "bad" rafters at each end, held in place as a lower "stop" with bungies. The gutter board rested on these, and was held in place by the rope, looped aroung the ridgepole and tied to a joist. With this rig I could easily adjust the position of the gutter board and affix it in place with screws.
Day 12 (08/16/2007)
Today I installed the lower siding (full sheets) on the shed. I marked the point on the sub-floor where I wanted the wall siding to overlap, then measured up from that and marked this with a chalk-line. Nails set on the bottom marks held the panels while I applied PL-400 to the joists, then set the panel and used 2" finishing nails to hold the panel in place until the glue set. Each side wall took two 8 foot panels, and for the back wall I cut two panels to 5' so they would meet in the middle. Instead of using 8' and 2', I went for symmetry. The remaining 3' sections were perfect for the front, which required 2' 6".
After supper, it was back to Home Depot for more PL-400, more nails, more deck screws (for the roof OSB), and two more 14' 2x6 boards to replace the ones that I mis-cut yesterday.
 1.jpg)
 2.jpg)
 3.jpg)
 4.jpg)
 5.jpg)
Day 13 (08/17/2007)
Today started pretty well. I started by cutting four new end rafters from the new 14' 2x6 lumber that I bought yesterday, then I installed the rafters on the outer ends of the shed.
After that, I started to put up the OSB sheathing for the roof. At first I was going to lay it out "horizontally" along the roof, but the ridge pole has some variance, making that difficult to fit. Besides, that was going to involve a lot of panel cutting (4' sections, 4' by 3' sections, etc.). After some thinking, I decided to lay the roof panels "vertically", with each panel running continuous from peak to gutter. Even better, after it's all done I could snap a chalk-line and just trim off the 1' excess instead of pre-cutting the panels. Once I decided on this strategy, work went fast. Lining up the panels was easy, with two bungee cords providiing tension to hold things in place while I screwed the panel in place. A quick stop for lunch, and the roof was panelled.
Unfortunately, while finishing up attaching the panels to the gutter, my aluminum ladder gave a quick wobble, then the leg crumpled, sending me to the ground. Fortunately I missed the rocks, but only because I landed on the ladder instead. Nothing broken, but I'm gonna be black-and blue down my right side tomorrow!
As it's been raining on and off all day, I wanted to cover the OSB roofing panels before I quit for the day. However, my two tarps are 8x16, and the roof is 14x20. In the end, my neighbor Bill made me a deal (he's building a shed next door)... If I would drive over and pick up a 24" flat-bed compactor, he and Andy and Neil would cover my roof with tarpaper. I could not pass up such a sweet deal. In addition, Andy, who is a teriffic framing carpenter, also trimmed the OSB panels in about one quarter the time it would have taken me. When I arrived home with the compactor, my roof was papered with 30lb roofing felt.
To do: cut the remaining siding and finish installing it on the shed. Purchase shingles (10 bundles should do it) and shingle the roof. Also in there, building and installing two doors.
 1.jpg)
 2.jpg)
 3.jpg)
 4.jpg)
Day 14 (08/18/2007)
Today was a "take it easy" day, thanks to yesterday's ladder incident. It was also raining off and on all day, so no real incentive to get a lot done outside.
I ripped the remaining four exterior siding panels to 2' hight and installed the 8' panels on each side. Two I cut to 4' and then installed them to the front and back corners of the side walls. I had a 6' panel left over from the new tin shack studio, so I cut it to 2' high and installed it on the back wall. There's not enough material with the lower overlap to complete any more work today, so I quit for the day.
One more panel would finish all the walls, or I could install some type of window in the front beside the doors. I will think about this. There's enough material to install in the gable ends, but I'm kind of leaning towards installing those triangular pieces with the grooves going vertical, just for a bit of a change. It would also use the material to better advantage, I think.
 02.jpg)
 03.jpg)
 04.jpg)
 05.jpg)
 06.jpg)
 09.jpg)
Day 15 (08/21/2007)
Another "take it easy" day. I decided to go in to Nanaimo and pick up shingles and one more exterior panel from Home Depot, but it turned out that HD does not carry the brand of shingles I want (Highland 30 yr, Antique Brown). So instead I just returned some extra tubes of PL400 and bought the one panel I needed to finish the sides.
Once home, I decided to cut the panel and finish the sides. It was fairly quick work to accomplish. As a result the shed is now completely sided. Friday will be a trip south to buy the shingles, plus some 2x2 for the gable windows and the door. I'm thinking of building a sided 5x5 door made on a 2x2 frame. I also want to pick up lag bolts and some tools from CDN Tire on sale, so Friday is Duncan day.
Day 16 (08/24/2007)
Drove to Duncan and picked up 12 bundles of shingles, enough for 300 sq. ft. (the roof is 280). Also picked up the 2x2's and lag bolts. Later in the day I installed four lag bolts to tie the shed securely to the skids.
Day 17 (08/30/2007)
Today began with a trip to Home Depot (Nanaimo) in the truck to pick up some roof nails for the pneumatic roofing nailer that I've borrowed from my neighbor Bill. While there, we picked up paint for the outside railings (some will be used on the shed trim), plus paint and supplies to paint the rooms on the upper level of the house.
The day was hot and sunny, so I waited until 3pm - doing some work on the computer to pass the time plus boosting some gas to fill my scuba cylinders for a Saturday dive. At 3pm, time to gather the equipment - compressor, nailer, nails, shingles, knife, etc. and beging shingling the roof. Work begins with a starter strip (upside down shingles) along the bottom edge and up the sides. Then begin laying out the courses and nailing them as per the directions (4 nails each). Trim the last shingle to fit and ensure all joints covered, and so it goes. By 6 p.m. I was about 2/3 complete on one side. After supper (6:30 p.m.) I went back at it, and finished one side, then started the other side. I was able to complete 3 full rows before dark (9 p.m.). (Total time on roof today = 3 hrs + 2hrs = 5hrs and VERY SORE!)
Tomorrow I will need to buy another bundle of shingles to finish, as the bundles state FOUR (4) bundles to a square, which covers 100 sq. ft. NOT three (3) bundles to a square as I was told. As it stands, I had two shingles left over from the glassblowing shop roof, and used them plus 1/2 of the shingles I bought to finish half the roof (6 bundles). That means that I should be two shingles shy of completing the remainder of the roof, hence the need to buy another bundle.

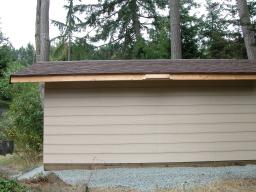
Day 18 (08/31/2007)
Today I was going to start by going to Duncan to buy the needed shingles, but decided to shingle the roof instead and see where that left me on shingles. Good thing I did, as a check on the internet reminded me to fold over the top rows. So, a new row was added to the side already done, then on to shingle the other side. This took from 9:30 am until noon. Then I was out of shingles, and it was lunch time.
After lunch, a quick trip to Duncan and I had my shingles, some 1x2 lumber and some paint for the pond. I needed about 10 shingles, but bought 2 bundles so Bill would have some to start, plus a bundle of single-thickness tri-tab shingles to make the ridge cap.
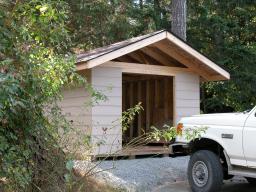
Working from 2:30 until 4pm, I was able to complete the roof. From 4:00 to 5:00pm I cleaned up, including trimming the tar paper on the front and back. THE ROOF IS NOW COMPLETE. (Total time on roof today = 2.5 hrs + 1.5 hrs = 4 hrs plus 1 hour cleanup. AND I'M STILL SORE!!!)
Day 19 (09/03/2007)
Today is labour day, so I decided to do some labour. My back is still sore from the roofing effort, but I decided to begin building my doors. Rather than a single 5' door, I've decided to build two doors that open inwards (so you can't tamper with the hinges). I cut the 2x2 lumber into components to make two doors, then used 3" deck screws to secure them together. After setting them aside, I measured and cut the leftover siding panels into panels for the doors. Once this was done, I used nails and PL400 to secure the panels to the doors and set them aside to dry.
I also took the opportunity to cut some panel material to create a panel section for above and below the door. These areas were not panelled originally as they were long thin shapes. I also attached some 1x2 trim pieces to the gable ends.
Later we took a trip to Home Depot to look at flooring on sale (there was none) and pick up some hinges. Again I managed to forget to look at soffit. Sheesh.
Day 20 (09/04/2007)
Today I created a template and used a router to cut out material for the door hinges, then installed the hinges on the doors. After locating the doors, I did the same for the doorjams and installed the hinges. The doors have good clearance top and bottom. Due to fluctuation (i.e. warping) of the 2x2s, they don't quite close fully, but have a bit of spring. This will even out once the hardware to lock the doors is in place. There's also a gap between the two doors of almost 1/2 inch, which was something that I estimated would happen when designing the doors. Better that than not able to close. A trim board on the front will cover that and look good.
I got some trim wood (1x3) that I will use to cover the door gap, plus the shed corners where the panels are joined.
Day 21 (09/06/2007)
Today I went to Home Depot in Nanaimo to pick up some hardware to lock the shed doors. Of course I forgot to look at soffit again, and am not 100% happy with the hasp set I bought. Wasted trip.
Day 22 (09/07/2007)
I was going to lock the left door (when facing the front of the shed) using a bolt through the door and the floor, but decided to look at sliding latches instead. So today I went to Home Hardware in Duncan to buy the latches. I also decided that the doors would close better if I could plane off some of the overhanging siding where I attached it. I looked and looked, but my father's block plane is nowhere to be found.
So the trip to Home Hardware also included looking for a block plane, plus a couple of tubes of PL400 to attach the trim and corner boards. I got some heavy-duty sliding latches (4" x 3/8") for the left door, and some lighter ones (4" x 1/4") for the right door. The idea is to latch the left door from the inside, and the right door from the outside, then lock them somehow (not sure how yet...).
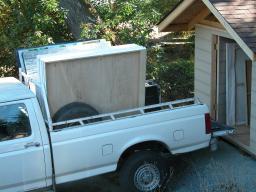
On the way back from Home Hardware, I stopped at the storage shed in Ladysmith to pick up all of the kid's artwork. Danielle has 6 heavy baltic plywood (many layers) paintings that are 5' x 5', plus some large canvas ones, plus both Dave & Danielle have many smaller works. As it turned out, they totally filled the back of the truck. Once home, I unloaded them into their new home - the shed.
I installed both sets of latches - they slide into the framing, which makes them quite secure. The block plane was just what was required to make the doors close much better.
Day 23 (09/08/2007)
I started today with a trip to Home Depot to FINALLY look at soffit, plexiglass for the windows, and maybe an air nailer combo. When I arrived, they had one banged up sheet of the vinyl soffit left. The plexiglas was all the wavey solarium stuff - not appropriate for this application. Also, they had no nailer combos on sale. I am really getting tired of Home Depot always being out of stuff I want. Eight zillion badly cut pressure treated stair hangers, but no soffit! I think it's "back to Rona" time for a long while.
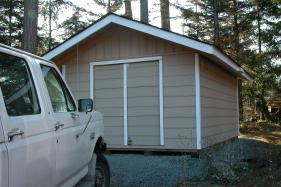
Once back home I cut the white 1x3 trim boards into 6' lengths, then attached them to the siding corners with PL400 and finish nails. The overall effect is quite nice. I then attached a trim board to the left door, to cover the center gap. Again, it looked great. I needed screws to hold this trim board in place as the panels were overlapped without the benefit of the factory shiplap on the bottom, so they stand out. Still, it worked well and looks good.
Bill called from his yard to say how good the trim looked. I held up a board beside the door, and he agreed that trimming the doorframe would look good as well, so that was done in quick order. The only fun was the last (overhead) piece - the last trim board was as bent as a hockey stick, and it took some pressure to place the board in straight.
Day 24 & Day 25 (09/14/2007 & 09/15/2007)
Took a couple of days off shed work to replace the fuel pump in the forward gas tank of the white truck. THAT was a job. The new pump core was $300 (ouch!), but once in it works like a charm, and I have the forward tank gas guage working again as well. Took one day to remove, and one day to replace and reinstall.
No work on the shed, but I made two trips to the rented storage shed to move stuff from there into the new shed. Friday, picked up all the 1.5 c.f. boxes and many of the 'banker' boxes. Saturday, picked up all of Dave & Danielle's boxes plus the dollhouse and other kid toys.
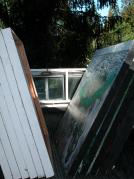
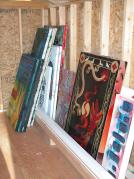
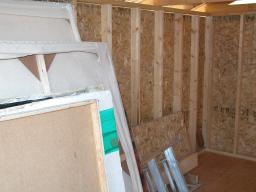
One side of the shed is quite full, the back is full of artwork, and the remaining space is taken up with unused building materials.
Day 26 & Day 27 (09/19/2007 & 09/20/2007)
Wednesday, drove to Duncan to get some more paint for the pond... white was all they had. Oh well. Also found a great slide-bolt with lock capabilities, so bought that and extra 2" stove bolts to install it.
On the way home, picked up the last load of stuff from the storage shed and brought it home. Have a nasty cold, but still need to be out before next week. Filled the truck again, this time with plastic tubs of fabric & lego, plus everything else left after the two other trips. Only getting the empty moving boxes and sweeping the floor remains to be done.
Once home, started to install the locking bolt, but the 2" bolts are too short. Two fit, so the shed now locks. Moved out the 2x4's, put 2x2's into the rafters, and packed the shed full of stuff.
On Thursday, drove to Ladysmith to get longer bolts, then swung by the storage shed to pick up the boxes and sweep out the unit. Closed out the account before I left, so the storage shed is now history. Back home, installed the longer bolts, then managed to lock the key in the shed, but I had a spare. Now the shed is secure (and full) and only requires gable windows and the soffit.
Day 28 & Day 29 (10/13/2007 & 10/20/2007)
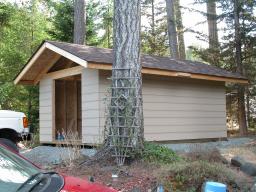
Waited quite a while to complete some finishing details on the shed. Mostly I was waiting for Home Depot to get my new portable table saw in stock. Once that was in, I was ready to begin the gable end covering. I had played with the notion of a windowed gable (all plexi), and even built a 2x2 frame for it. However, one problem let to another, and I never was really happy with the design. Finally, I settled on my original design, which was to turn the siding vertically and cover in the gable.
With the new table saw, this was a fairly easy one day project. Of course, cutting the siding at the correct angle proved to be quite the challenge. Actually, I tried this several weeks before "freehand" using just a ruler and a skill saw, but merely ended up creating firewood. With the table saw, it was much easier to cut consistent pieces. Once cut, the pieces were fitted and held in place with screws so that I can change things if I want next spring. I do like the look of the vertical siding on the gable.
I did use my lesson #2 (below) when cutting the panels. With the table saw precision, I was able to cut part of the tongue off to create consistent joints between the panels when butted together.
The last job was also pretty simple, barring a bit of truck difficulty. I purchased a quantity of vinyl soffit (sandalwood color) and some aluminum 'J' channel in Nanaimo, and lost a rear truck tire at highway speed on the way home. I appears the tire simply lost it's tread and shredded. A call to AMA for some penetrating oil and a larger lug wrench and I was home safe.
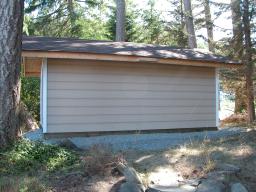
I planned to angle the soffit under the eaves along the main shed, and this proved pretty easy. I did need J channel on boh sides to ensure the soffit was held securely. Using 16" soffit, the 8 foot span of the shed was covered beautifully with no need for trimming. The front and back overhangs are cosmetic, and can wait for good weather, or even until next spring.
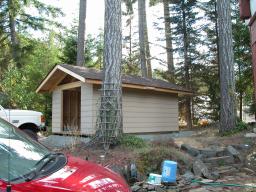
For now, the shed building project is complete. The shed is fairly well 'critter proof' and dry. It is also quite full!
Some Lessons Learned
The shed is almost complete. Remaining work includes soffit, gable window frames and windows. The shed has now fulfilled it's intended purpose as everything has been transferred from the rented storage unit into the shed. Time to reflect on some "lessons learned", and things I would do differently, or correct if I were to build another shed.
- Install the OSB roofing panels RIGHT SIDE UP!!! The rough side goes up, and it clearly states that on the panels if I would have read them. There's no problem with them upside down, except they are very slippery to walk on (once the tarpaper is on, it no longer matters).
- I am not happy with the way I attached the siding panels to the the doors. The factory shiplap joint is gone once you trim a panel. The upper joint is 1/4" thick by 1" wide, which you overlap by 5/8". I just overlapped the panels, which means the bottom of each panel stands 1/4" higher. I should have cut off the 5/8" overlap and butted the panels - then they would now lie flat. It looks OK, but that would have looked better, and the center door trim would have been much easier to attach.
- Working alone is tough, but all jobs were doable. It was nice to get help tarpapering the roof.
- Using screws instead of nails for the framing and decking was a great timesaver, and I think makes a much stronger building. A pneumatic nailer would have been faster, but they do cost. The borrowed pneumatic roofing nailer was both a godsend and a necessity.
- Home Depot has the best prices on a lot of stuff, but they are frequently out of common materials (nails, soffit, etc.). It's as far as Duncan for us, and "trips for nothing" get very tiresome.
- a block plane beats a belt sander or a rasp when you have to shave material off a straight edge. In my glass shop and in this shed, trimming the panels (for windows in the glass shop, and the doors here) took many, many minutes with a belt sander and rasp, and still the job was not complete. With a block plane, I was able to complete the job in under 5 minutes. Same for the door to the glass shop - 5 minutes with a block plane fixed the sticking problem that 20 minutes with a belt sander could not touch.
- This shed was completely "designed on the fly". I would draw a design, reflect on it, make some alterations, then build it. The initial design was done in the week before the build started. Some elements (doors, gable windows) where designed during the build. I found that I often need to see something partially built to decide how I want to continue. This is the second time I've used this technique - first with my glassblowing shop, and now with this shed. I must say that I am really very happy with both of my designs and builds.